笔记
单击此处 下载完整的示例代码
默认文本旋转演示#
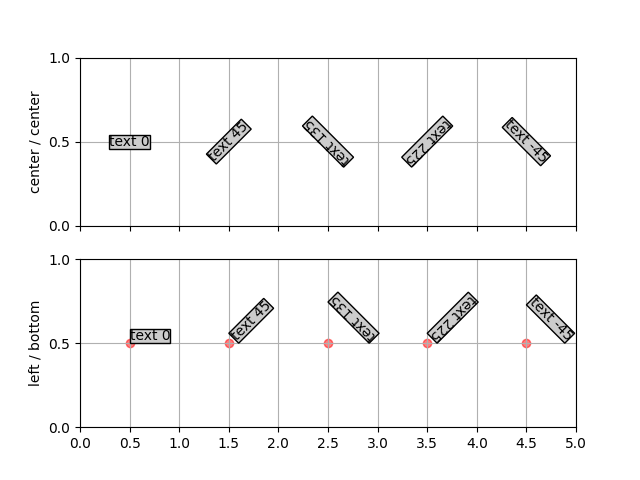
Matplotlib 默认进行文本布局的方式对某些人来说是违反直觉的,所以这个例子旨在让它更清晰一点。
文本通过其边界框(围绕墨迹矩形的矩形框)对齐。操作的顺序是旋转然后对齐。基本上,文本以您的 (x, y) 位置为中心,围绕该点旋转,然后根据旋转文本的边界框对齐。
因此,如果您指定左下对齐,则旋转文本的边界框的左下角将位于文本的 (x, y) 坐标处。
但一张图胜过千言万语!

import matplotlib.pyplot as plt
import numpy as np


def addtext(ax, props):
    ax.text(0.5, 0.5, 'text 0', props, rotation=0)
    ax.text(1.5, 0.5, 'text 45', props, rotation=45)
    ax.text(2.5, 0.5, 'text 135', props, rotation=135)
    ax.text(3.5, 0.5, 'text 225', props, rotation=225)
    ax.text(4.5, 0.5, 'text -45', props, rotation=-45)
    for x in range(0, 5):
        ax.scatter(x + 0.5, 0.5, color='r', alpha=0.5)
    ax.set_yticks([0, .5, 1])
    ax.set_xticks(np.arange(0, 5.1, 0.5))
    ax.set_xlim(0, 5)
    ax.grid(True)


# the text bounding box
bbox = {'fc': '0.8', 'pad': 0}

fig, axs = plt.subplots(2, 1, sharex=True)

addtext(axs[0], {'ha': 'center', 'va': 'center', 'bbox': bbox})
axs[0].set_ylabel('center / center')

addtext(axs[1], {'ha': 'left', 'va': 'bottom', 'bbox': bbox})
axs[1].set_ylabel('left / bottom')

plt.show()